Recently my laptop got stolen and that gave me a push to build my lab on Azure. I tweeted this and got an awesome reply by Jim Christopher[PowerShell MVP] :

Thanks to my friend Fenil Shah who lend me his laptop to try out Azure.
Cheers to having awesome friends :)
I thought it would be better if I put my notes as a post. These are entirely for my reference ;)
The best posts around Azure + PowerShell are by Michael Washam which can be found on his blog here.
My Action plan is to configure a ServerCore Server 2012 R2 machine running Active Directory for this post from scratch, I don't have anything right now on my azure account.
Below are the steps:
Once you have the settings file imported, you can remove it and then you can see that the Subscription information has been imported successfully using
After one has imported the Subscription information , one has to select the Subscription in order to use it , below is what I did [Note - I have only one subscription so I used (Get-AzureSubscription).SubscriptionName below ] .
Now to verify that this is the Subscription my Azure cmdlets will run against run the below and it should show your default Subscription details:
At this point we need to have a storage account before proceeding further as this is where your data (VM's VHD etc ) will be stored. I am going to create a storage account with the name "dexterposhstorage" (note all lowercase letters and numbers allowed).
While doing this if you get an error like below:
New-AzureStorageAccount : Specified argument was out of the range of valid values.
Then probably the name you choose for the storage account is already taken or it doesn't adhere to the naming standards (only lowercase letters and numbers).
Once you have the storage account created, set it as the current storage account to be used for your default subscription (as you can create many storage account but only use one at a time )
Note - The above steps are one time activity. Once you have followed the above steps then next time you have to just load the Azure PS Module and start automation.
In order to run a full blown LAB in Azure with my own DNS, AD etc. I have to use Virtual Networks. Right now the easiest way to do this is using the portal as there are no cmdlet to create a new VNET, there is a Set-AzureVNetConfig which requires us to create and manipulate an XML file to create VNETs, but I was looking to do this ASAP ( there are links in resources section if you want to automate this part too).
Below is the XML which I got after adding the VNET from the portal

Below is how the VNet looks like in the Azure Management Portal:
Note that in the subnet "AD" the first usable IP address is 192.168.0.4
If you want to do this using PowerShell too (which I will eventually then refer the resources at the end).
Now time to create a new Affinity Group.
Also I have turned off Geo-replication as this is my test LAB (my preference).
In Azure when you deploy a VM it is associated with a cloud service (which is a logical container for Azure resources). So let's create a new one
The house keeping activities needed to deploy VMs is done for my Azure Subsccription. Now I need to select a Image from the gallery and use it to deploy my VMs. The cmdlet to get the images is Get-AzureImage but out of all the images am looking only for the latest Server 2012 R2 image.
I use the below to get the image stored in the variable $image (see the use of -OutVariable)
While deploying VMs in Azure one has to build configurations before finally creating it, so let's build the first one to specify the VM Instance size, image name (from above) etc and store the config in a variable named $NewVM.
Note the use of Tee-Object to store the Object in Variable. Now people might wonder why not use the -OutVariable as above then a small hint , go ahead and use it and check the type of the object being returned ;)
Time to add another config to our VM which will specify the Admin User Name and Password for the VM:
The first VM deployed in our LAB will be a Domain Controller and we need to make sure that it gets the same local IP Address, that's why we created a Subnet named "AD" in our Virtual Network and we will place our VM there (only machine in that subnet, ensuring that it gets the first usable IPaddress there).
In addition to this as an extra precaution , we can use the cmdlet Set-AzureStaticVNetIP to bind the IP address to our VM.
After all the configurations being created, we will finally create the new VM
As an alternative one can use the New-AzureQuickVM (use this if you are using Azure Automation feature). There are few cases where New-AzureVM fails miserably.
Note - In addition one can specify the -WaitForBoot (New-AzureVM) to pause the Script execution until the VM is up and ready.
Once the VM is up and running it is time to add a new disk to it for storing the SysVol folder for the AD Domain Services. I wanted to do this using PowerShell too as the Server 2012 supports disk management tasks. But for this I need to configure my laptop to be able to talk to the WinRM endpoint sitting behind the cloud service (by default RDP and WinRM endpoints for each of the VMs are opened).
Again this has already been explained at the below link:
http://michaelwasham.com/windows-azure-powershell-reference-guide/introduction-remote-powershell-with-windows-azure/
Following the above link, below code does the work for me:
After this I can remote in to my VM running up on Azure and perform all the tasks I want to, isn't it amazing ;)
Using the cmdlet Get-AzureWinRMUri, we get the connection URI.
also create credential object to be passed on when opening a PSSession.
Hopefully if we did everything right we will have a PSSession open.
Please note that at the end we need to pipe the output of Add-AzureDataDisk to Update-AzureVM.
Now if you would have connected using RDP and opened the diskmgmt.msc then you could have added the new disk (GUI way).
But we are going to use PowerShell for that as the server we choose is Server 2012 R2 (which has the disk mgmt cmdlets shipped with it).
Below is the code, which will initialize , partition and format our new disk:
You can verify the result by running the Get-Disk cmdlet in the remote PSSession.
We will put the NDTS & SysVol folder in our new data disk we added.
Reboot your VM and you have your test domain up and ready in the cloud (for me it is dex.com).
One more thing once all is done, I switched my Domain Controller to the ServerCore ;)
Below is the snippet which does it for me.
That's it for today, probably one more post will follow which will focus on doing this entire setup using the Azure Automation (workflows).
I will be showing this at Microsoft Community Day on 23rd August, let's see if I can get that recorded.
[UPDATE] You can find the Script Snippet in entirety at below link:
https://gist.github.com/DexterPOSH/ae7ddcc6fa6aafacebc4
Resources:
http://michaelwasham.com
http://blogs.technet.com/b/keithmayer/archive/2014/08/15/scripts-to-tools-auto-provisioning-azure-virtual-networks-with-powershell-and-xml.aspx
http://blogs.blackmarble.co.uk/blogs/rhepworth/post/2014/03/03/Creating-Azure-Virtual-Networks-using-Powershell-and-XML.aspx
http://blogs.technet.com/b/kevinremde/archive/2013/01/19/create-a-windows-azure-network-using-powershell-31-days-of-servers-in-the-cloud-part-19-of-31.aspx
http://blogs.technet.com/b/keithmayer/archive/2014/04/04/step-by-step-getting-started-with-windows-azure-automation.aspx
Thanks to my friend Fenil Shah who lend me his laptop to try out Azure.
Cheers to having awesome friends :)
I thought it would be better if I put my notes as a post. These are entirely for my reference ;)
The best posts around Azure + PowerShell are by Michael Washam which can be found on his blog here.
My Action plan is to configure a ServerCore Server 2012 R2 machine running Active Directory for this post from scratch, I don't have anything right now on my azure account.
Below are the steps:
- Sign Up for Azure (Free Trial is available)
- Install Azure PowerShell Module & Configure your subscription
- Create a Virtual Net for your LAB
- Deploy the VM
- Connecting to VM using PSRemoting
- Add a new Data Disk to VM
- Install ADDS and a new domain.
Steps 1-3 are one time activity, next time you want to spin a VM then no need to do these.
Sign Up for Azure
Go to https://azure.microsoft.com/en-us/ to sign up for a free trial of azure.
One has to supply their Credit Card / Debit Card information for verification which will deduct $1 (this is refunded back..don't worry you misers :D ).
Note - There is a credit limit of $200 in free trail and by default your subscription won't go above this limit, so be assured.
One has to supply their Credit Card / Debit Card information for verification which will deduct $1 (this is refunded back..don't worry you misers :D ).
Note - There is a credit limit of $200 in free trail and by default your subscription won't go above this limit, so be assured.
Install Azure PowerShell Module & Configure your Subscription
There are very good articles below which describes this step:
Following the above two articles below is what I did:
001
002 003 004 005 006 007 008 009 |
# Get the Settings file
Get-AzurePublishSettingsFile #Import the file Import-AzurePublishSettingsFile -PublishSettingsFile "C:\Temp\Visual Studio Ultimate with MSDN-7-19-2014-credentials.publishsettings" #Remove the Settings once imported Remove-item "C:\Temp\Visual Studio Ultimate with MSDN-7-19-2014-credentials.publishsettings" |
Once you have the settings file imported, you can remove it and then you can see that the Subscription information has been imported successfully using
001
002 003 |
#get the Subscription details Get-AzureSubscription |
After one has imported the Subscription information , one has to select the Subscription in order to use it , below is what I did [Note - I have only one subscription so I used (Get-AzureSubscription).SubscriptionName below ] .
001
|
Select-AzureSubscription -SubscriptionName (Get-AzureSubscription).SubscriptionName
|
Now to verify that this is the Subscription my Azure cmdlets will run against run the below and it should show your default Subscription details:
001
|
Get-AzureSubscription -Default
|
At this point we need to have a storage account before proceeding further as this is where your data (VM's VHD etc ) will be stored. I am going to create a storage account with the name "dexterposhstorage" (note all lowercase letters and numbers allowed).
001
002 003 004 005 006 |
#create the Storage Account
New-AzureStorageAccount -Location "Southeast Asia" -StorageAccountName "dexterposhstorage" -Label "DexLAB" -Description "Storage Account for my LABs" -Verbose #Turn off the Geo Replication...am just using it for my lab Set-AzureStorageAccount -StorageAccountName dexterposhstorage -GeoReplicationEnabled $false -Verbose |
While doing this if you get an error like below:
New-AzureStorageAccount : Specified argument was out of the range of valid values.
Then probably the name you choose for the storage account is already taken or it doesn't adhere to the naming standards (only lowercase letters and numbers).
Once you have the storage account created, set it as the current storage account to be used for your default subscription (as you can create many storage account but only use one at a time )
001
002 003 |
#set your storage account
Set-AzureSubscription -SubscriptionName (Get-AzureSubscription -Default).SubscriptionName -CurrentStorageAccountName "deterposhstorage" |
Note - The above steps are one time activity. Once you have followed the above steps then next time you have to just load the Azure PS Module and start automation.
3. Create a Virtual Net for your LAB
In order to run a full blown LAB in Azure with my own DNS, AD etc. I have to use Virtual Networks. Right now the easiest way to do this is using the portal as there are no cmdlet to create a new VNET, there is a Set-AzureVNetConfig which requires us to create and manipulate an XML file to create VNETs, but I was looking to do this ASAP ( there are links in resources section if you want to automate this part too).
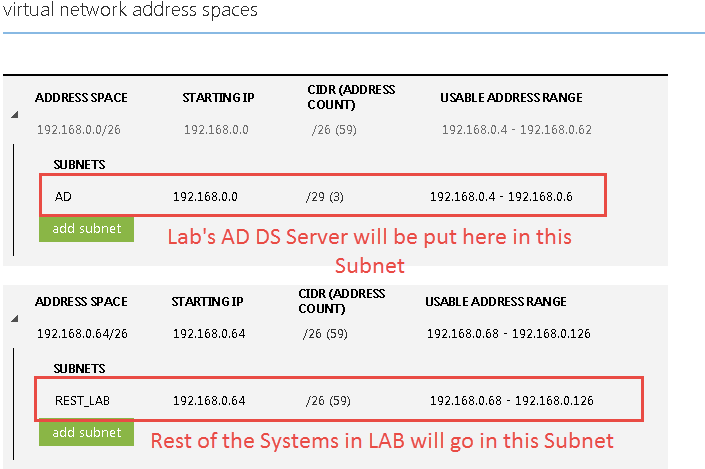
Below is the XML which I got after adding the VNET from the portal
Below is how the VNet looks like in the Azure Management Portal:
Note that in the subnet "AD" the first usable IP address is 192.168.0.4
If you want to do this using PowerShell too (which I will eventually then refer the resources at the end).
4. Deploy VM
If you are deploying a VM for first time then you have to create an affinity group (optional) , cloud service & Storage account (mandatory).
Now let's define few PowerShell variables for Affinity Group, Cloud Service, Storage Account , DNS Server IP Address and Name of our Domain Controller.
001
002 003 004 005 006 |
$AffinityGroup = "DexAffinityGroup" $cloudService = "DexCloudService" $StorageAccount = "dexterposhstorage" $DNSIP = '192.168.0.4' #the first usable IP address in our Subnet "AD" $VMName = 'DexDC' #Name of the VM running our Domain Controller |
Now time to create a new Affinity Group.
Also I have turned off Geo-replication as this is my test LAB (my preference).
001
002 003 004 005 006 007 008 009 010 |
#create a new Affinity Group for my Lab resources
New-AzureAffinityGroup -Name $AffinityGroup -Location "Southeast Asia" -Label DexLAB -Description "Affinity Group for my LAB" -Verbose |
In Azure when you deploy a VM it is associated with a cloud service (which is a logical container for Azure resources). So let's create a new one
001
002 003 |
#Now create a new Cloud Service
New-AzureService -ServiceName $cloudService -AffinityGroup $AffinityGroup -Label DexLAB -Description "Cloud Service for my LAB" -Verbose |
The house keeping activities needed to deploy VMs is done for my Azure Subsccription. Now I need to select a Image from the gallery and use it to deploy my VMs. The cmdlet to get the images is Get-AzureImage but out of all the images am looking only for the latest Server 2012 R2 image.
I use the below to get the image stored in the variable $image (see the use of -OutVariable)
[ADMIN] PS C:\> Get-AzureVMImage | where { $_.ImageFamily -eq “Windows Server 2012 R2 Datacenter” } | Sort-Object -Descending -
Property PublishedDate | Select-Object -First 1 -OutVariable image


ImageName            : a699494373c04fc0bc8f2bb1389d6106__Windows-Server-2012-R2-201407.01-en.us-127GB.vhd
OS                   : Windows
MediaLink            :
LogicalSizeInGB      : 128
AffinityGroup        :
Category             : Public
Location             : East Asia;Southeast Asia;North Europe;West Europe;Japan West;Central US;East US;East US 2;South
                       Central US;West US
Label                : Windows Server 2012 R2 Datacenter, July 2014
Description          : At the heart of the Microsoft Cloud OS vision, Windows Server 2012 R2 brings Microsoft's experience
                       delivering global-scale cloud services into your infrastructure. It offers enterprise-class
                       performance, flexibility for your applications and excellent economics for your datacenter and hybrid
                       cloud environment. This image includes Windows Server 2012 R2 Update.
Eula                 :
ImageFamily          : Windows Server 2012 R2 Datacenter
PublishedDate        : 7/21/2014 12:30:00 PM
IsPremium            : False
IconUri              : WindowsServer2012R2_45.png
SmallIconUri         : WindowsServer2012R2_45.png
PrivacyUri           :
RecommendedVMSize    :
PublisherName        : Microsoft Windows Server Group
OperationDescription : Get-AzureVMImage
OperationId          : b556cf7a-a4e8-c744-8471-f0ea0e3473ca
OperationStatus      : Succeeded


[ADMIN] PS C:\> $image.imagename
a699494373c04fc0bc8f2bb1389d6106__Windows-Server-2012-R2-201407.01-en.us-127GB.vhd
While deploying VMs in Azure one has to build configurations before finally creating it, so let's build the first one to specify the VM Instance size, image name (from above) etc and store the config in a variable named $NewVM.
Note the use of Tee-Object to store the Object in Variable. Now people might wonder why not use the -OutVariable as above then a small hint , go ahead and use it and check the type of the object being returned ;)
[ADMIN] PS C:\>  New-AzureVMConfig -Name $VMName -InstanceSize Small -ImageName $image.ImageName -DiskLabel "OS" -HostCaching R
eadOnly | Tee-Object -Variable NewVM


AvailabilitySetName               :
ConfigurationSets                 : {}
DataVirtualHardDisks              : {}
Label                             : DexDC
OSVirtualHardDisk                 : Microsoft.WindowsAzure.Commands.ServiceManagement.Model.PersistentVMModel.OSVirtualHardDis
                                    k
RoleName                          : DexDC
RoleSize                          : Small
RoleType                          : PersistentVMRole
WinRMCertificate                  :
X509Certificates                  :
NoExportPrivateKey                : False
NoRDPEndpoint                     : False
NoSSHEndpoint                     : False
DefaultWinRmCertificateThumbprint :
ProvisionGuestAgent               : True
ResourceExtensionReferences       :
DataVirtualHardDisksToBeDeleted   :
Time to add another config to our VM which will specify the Admin User Name and Password for the VM:
001
002 |
$password = "P@ssw0rd321"
$username = "DexterPOSH" |
[ADMIN] PS C:\> Add-AzureProvisioningConfig -Windows -Password $password -AdminUsername $username -DisableAutomaticUpdates -VM
$newVM


AvailabilitySetName               :
ConfigurationSets                 : {DexDC, Microsoft.WindowsAzure.Commands.ServiceManagement.Model.PersistentVMModel.NetworkC
                                    onfigurationSet}
DataVirtualHardDisks              : {}
Label                             : DexDC
OSVirtualHardDisk                 : Microsoft.WindowsAzure.Commands.ServiceManagement.Model.PersistentVMModel.OSVirtualHardDis
                                    k
RoleName                          : DexDC
RoleSize                          : Small
RoleType                          : PersistentVMRole
WinRMCertificate                  :
X509Certificates                  : {}
NoExportPrivateKey                : False
NoRDPEndpoint                     : False
NoSSHEndpoint                     : False
DefaultWinRmCertificateThumbprint :
ProvisionGuestAgent               : True
ResourceExtensionReferences       : {BGInfo}
DataVirtualHardDisksToBeDeleted   :
The first VM deployed in our LAB will be a Domain Controller and we need to make sure that it gets the same local IP Address, that's why we created a Subnet named "AD" in our Virtual Network and we will place our VM there (only machine in that subnet, ensuring that it gets the first usable IPaddress there).
In addition to this as an extra precaution , we can use the cmdlet Set-AzureStaticVNetIP to bind the IP address to our VM.
001
002 003 004 005 |
# set the AD Subnet for this machine
Set-AzureSubnet -SubnetNames AD -VM $newVM #set the Static VNET IPAddress of 192.168.0.4 for our VM Set-AzureStaticVNetIP -IPAddress $DNSIP -VM $newVM |
After all the configurations being created, we will finally create the new VM
001
|
New-AzureVM -ServiceName $cloudService -VMs $newVM -VNetName "DexVNET" -AffinityGroup DexAffinityGroup
|
As an alternative one can use the New-AzureQuickVM (use this if you are using Azure Automation feature). There are few cases where New-AzureVM fails miserably.
Note - In addition one can specify the -WaitForBoot (New-AzureVM) to pause the Script execution until the VM is up and ready.
Connecting to Azure VM using PSRemoting
Once the VM is up and running it is time to add a new disk to it for storing the SysVol folder for the AD Domain Services. I wanted to do this using PowerShell too as the Server 2012 supports disk management tasks. But for this I need to configure my laptop to be able to talk to the WinRM endpoint sitting behind the cloud service (by default RDP and WinRM endpoints for each of the VMs are opened).
Again this has already been explained at the below link:
http://michaelwasham.com/windows-azure-powershell-reference-guide/introduction-remote-powershell-with-windows-azure/
Following the above link, below code does the work for me:
001
002 003 004 005 006 007 008 009 010 011 012 013 014 015 |
$WinRMCert = (Get-AzureVM -ServiceName $CloudService -Name $VMName | select -ExpandProperty vm).DefaultWinRMCertificateThumbprint
$AzureX509cert = Get-AzureCertificate -ServiceName $CloudService -Thumbprint $WinRMCert -ThumbprintAlgorithm sha1 $certTempFile = [IO.Path]::GetTempFileName() $AzureX509cert.Data | Out-File $certTempFile # Target The Cert That Needs To Be Imported $CertToImport = New-Object System.Security.Cryptography.X509Certificates.X509Certificate2 $certTempFile $store = New-Object System.Security.Cryptography.X509Certificates.X509Store "Root", "LocalMachine" $store.Open([System.Security.Cryptography.X509Certificates.OpenFlags]::ReadWrite) $store.Add($CertToImport) $store.Close() Remove-Item $certTempFile |
After this I can remote in to my VM running up on Azure and perform all the tasks I want to, isn't it amazing ;)
Using the cmdlet Get-AzureWinRMUri, we get the connection URI.
001
002 003 |
#Now I can use the Get-AzureWinrmUri
$WinRMURi = (Get-AzureWinRMUri -ServiceName $cloudService -Name $VMName).AbsoluteUri |
also create credential object to be passed on when opening a PSSession.
001
002 003 004 005 006 007 008 |
#Convert our plain text password to secure string
$passwordsec = ConvertTo-SecureString -String $password -AsPlainText -Force #create the Creds Object $cred = new-object -typename System.Management.Automation.PSCredential -argumentlist $username,$passwordsec #Open up a new PSSession to the Azure VM $Session = New-PSSession -ConnectionUri $WinRMURi -Credential $cred |
Hopefully if we did everything right we will have a PSSession open.
Add a new data disk to VM
Let's add the data disk now.
001
002 003 |
#add new data disk to store the NTDS and SysVol folders
Add-AzureDataDisk -CreateNew -DiskSizeInGB 20 -DiskLabel "NTDS" -LUN 0 -VM $DexDC | Update-AzureVM |
Please note that at the end we need to pipe the output of Add-AzureDataDisk to Update-AzureVM.
Now if you would have connected using RDP and opened the diskmgmt.msc then you could have added the new disk (GUI way).
But we are going to use PowerShell for that as the server we choose is Server 2012 R2 (which has the disk mgmt cmdlets shipped with it).
Below is the code, which will initialize , partition and format our new disk:
001
002 003 004 005 006 007 008 009 010 011 |
Invoke-Command -Session $session -ScriptBlock { Get-Disk | where partitionstyle -eq 'raw' | Initialize-Disk -PartitionStyle MBR -PassThru | New-Partition -AssignDriveLetter -UseMaximumSize | Format-Volume -FileSystem NTFS -NewFileSystemLabel "NTDS" -Confirm:$false } |
You can verify the result by running the Get-Disk cmdlet in the remote PSSession.
Install ADDS and a new domain
Perfect now we have everything to promote this Azure VM as the first domain controller for our new forest.We will put the NDTS & SysVol folder in our new data disk we added.
001
002 003 004 005 006 007 008 009 010 011 |
Invoke-Command -Session $Session -ArgumentList @($password) -ScriptBlock { Param ($password) # Set AD install paths $drive = get-volume | where { $_.FileSystemLabel -eq “NTDS” } $NTDSpath = $drive.driveletter + ":\Windows\NTDS" $SYSVOLpath = $drive.driveletter + ":\Windows\SYSVOL" write-host "Installing the first DC in the domain" Install-WindowsFeature –Name AD-Domain-Services -includemanagementtools Install-ADDSForest -DatabasePath $NTDSpath -LogPath $NTDSpath -SysvolPath $SYSVOLpath -DomainName "dex.com" -InstallDns -Force -Confirm:$false -SafeModeAdministratorPassword $password } |
Reboot your VM and you have your test domain up and ready in the cloud (for me it is dex.com).
One more thing once all is done, I switched my Domain Controller to the ServerCore ;)
Below is the snippet which does it for me.
001
002 003 |
#Convert to Server Core
Invoke-Command -Session $Session -script { Uninstall-WindowsFeature Server-Gui-Mgmt-Infra,Server-Gui-Shell -Restart} |
That's it for today, probably one more post will follow which will focus on doing this entire setup using the Azure Automation (workflows).
I will be showing this at Microsoft Community Day on 23rd August, let's see if I can get that recorded.
[UPDATE] You can find the Script Snippet in entirety at below link:
https://gist.github.com/DexterPOSH/ae7ddcc6fa6aafacebc4
Resources:
http://michaelwasham.com
http://blogs.technet.com/b/keithmayer/archive/2014/08/15/scripts-to-tools-auto-provisioning-azure-virtual-networks-with-powershell-and-xml.aspx
http://blogs.blackmarble.co.uk/blogs/rhepworth/post/2014/03/03/Creating-Azure-Virtual-Networks-using-Powershell-and-XML.aspx
http://blogs.technet.com/b/kevinremde/archive/2013/01/19/create-a-windows-azure-network-using-powershell-31-days-of-servers-in-the-cloud-part-19-of-31.aspx
http://blogs.technet.com/b/keithmayer/archive/2014/04/04/step-by-step-getting-started-with-windows-azure-automation.aspx